Targetable will suggest Campaigns for you, but you can also create your own. To create a Campaign, follow the instructions below.
- Click the Home menu button in the upper-left corner of the browser.
- Click the Campaigns button.
- Click the Create button.
- Enter a Title for your Campaign. This Title will not be seen in Facebook, and will only be seen in Targetable.
- Set the Budget and Schedule for your Campaign.
Budget:
You can adjust the Budget by changing either the Lifetime Cost or the Daily Cost. Note that changing the length of your Campaign’s Schedule will impact the price of the Daily Cost, but will not alter the Lifetime Cost.
We generally recommend starting with $5 per day for a Campaign. That‘s enough to determine if the ad will work. From there, you can react over time and invest in Campaigns that are working while reducing the budget on those that don’t.
We’ve built our software to ensure your Suggested Campaigns always comply with Facebook’s rules. There’s no need to run a trial Campaign to check.
Schedule:
To change the dates of the Campaign’s start and end, click on their Calendar icon. Choose your intended Date and click OK.
While there are some exceptions, we suggest running a Campaign for a week at a time. This generally gives the Campaign enough time to perform. If you begin to see diminishing returns, try updating your Campaign with new text, image, or keywords to get better results.
If you’d like your Campaign to run during specific hours of the day, click All Day. This will open a dropdown menu where you can choose from the following options: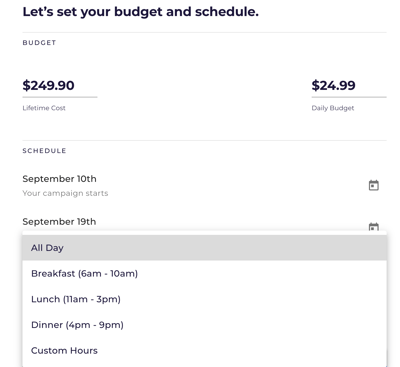
Select Custom Hours to start and end your Campaign at times that work best for you, as demonstrated below: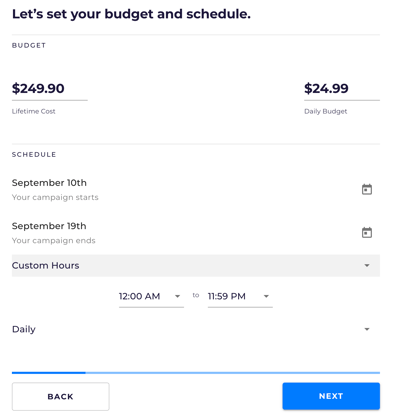
Note that the start time will always be at the top of the hour, and the end time will always be the last minute of an hour.
If you’d like your Campaign to run on specific days of the week, click Daily. This will open a dropdown menu where you can choose from the following options: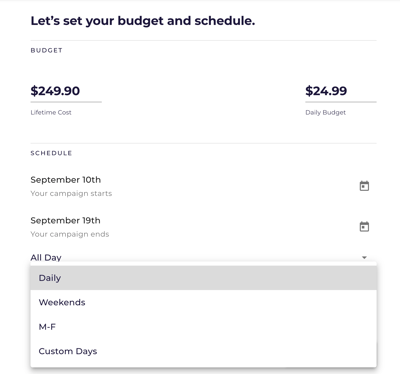
Selecting Custom Days will produce a drop-down menu that allows you to pick which days of the week to run your Campaign, as shown below: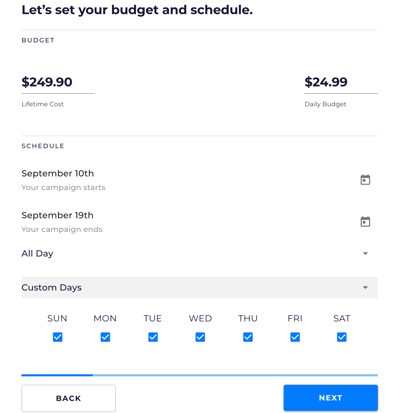
Once you’ve set your budget and schedule, click the Next button. - Add Keywords and choose language(s).
Keywords:
To enter keywords for your Campaign, click on the Add Targets field and type in your keywords. Targetable will search for and automatically present matching interests in Facebook, as shown below:
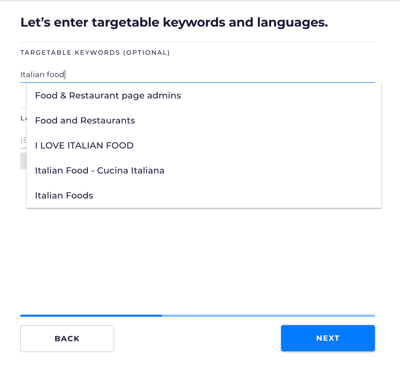
Select your keyword from the options available in the dropdown menu. You can delete a selected keyword by clicking the X near the keyword.
You don’t have to add keywords, but they help put your ads in front of the right people. We suggest experimenting with two to four keywords, and then slowly adding, removing, or changing them to monitor their effect on performance. By matching your keywords with characteristics about the ad’s audience, you’re more likely to find people who will resonate with your Campaign.
Keywords should make sense for your restaurant and specific Campaign. Try to think of who the advertisement will appeal to when choosing your Keywords, and this will help determine which prospective customers to target.
Languages:
By default, the Language will be set to English (US). To add a new Language, click on the empty field below Language Target and type in a language. Targetable will search for and automatically present matching options. Simply delete a selected language by clicking the X near the language. Once you’ve set your keywords and language, click the Next button.
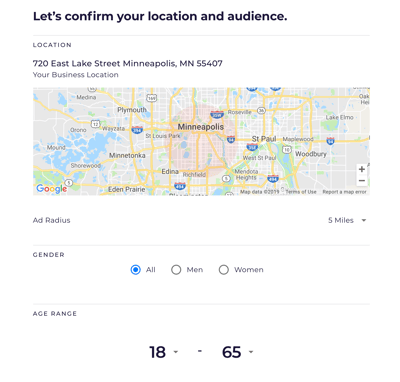
- Set the Ad Radius and Audience for your Campaign
Radius Targeting:
Let’s imagine that your restaurant is a bullseye. Your Ad Radius represents the geographical area around your restaurant that you’d like to target with your Campaign. The Ad Radius is set to 5 miles by default because the people who spend time near your location are more likely to visit your restaurant than those farther away. Focusing your ads saves money and gets better results.
To change the radius, click on 5 miles to reveal a dropdown menu where you can choose from the following options:
Selecting Custom Radius will reveal a new dropdown menu where you can choose a custom distance for your Ad Radius, as seen below:
Audience:The Audience refers to the Gender(s) and Age(s) that you want to target with your Campaign.
You may choose between “All,” “Men,” or “Women” for Gender.
By default, Targetable sets the Age Range to 18 - 65, meaning that the Campaign will be delivered to users who have set their age between 18 and 65 years old.
To change either the youngest or oldest age of your Age Range, click on either age to reveal a dropdown menu where you can select a different age
Once you’ve set your Ad Radius and Audience, click the Next button.
- Design Your Ad
This is where you get to build the creative behind your Campaign: the ad copy and image. The Ad Copy is broken into three fields: Main Ad Message, Image Description, and Sub Message.
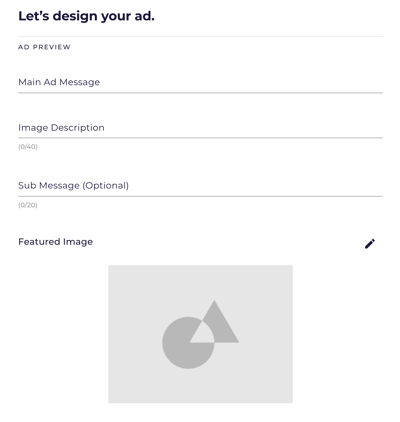
Main Ad Message:
This is the text that appears above your image in the Ad. The Main Ad Message is a required text field, and there is no character limit.
Image Description:This is the line of bolded text that appears underneath the image in your Ad. The Image Description is a required text field, and has a limit of 40 characters to ensure that this line of text does not get cut off.
Sub Message:
The Sub Message is another line of text that appears underneath the Image Description. This is an optional text field, and has a limit of 20 characters.
Featured Image:
The photo you use for your Ad is up to you. Choose from your Instagram and Facebook accounts, or upload new pictures from your phone or computer. Additionally, you’re more than welcome to search Targetable’s image library to find the perfect one.
Upload Your Own Image:To upload your image, click on the Pencil icon to the right of the Featured Image. Then click the Upload button, which will open a new window where you can drag & drop the image of your choice or press the Browse button to navigate your hard drive, as seen below:
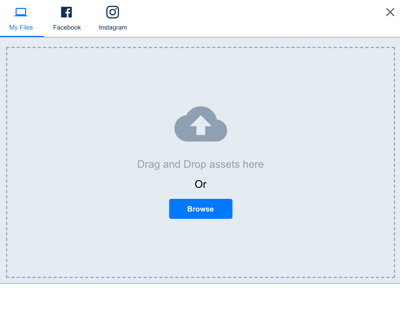
Use An Image From Your Facebook Account:To choose an image from your Facebook account, click on the Pencil icon to the right of the Featured Image. Then click the Upload button, which will open a new window. Click on the Facebook icon at the top of the window, and you’ll be presented with all of the pictures from your Facebook account.
Use An Image From Your Instagram Account:
To choose an image from your Instagram account, click on the Pencil icon to the right of the Featured Image. Then click the Upload button, which will open a new window. Click on the Instagram icon at the top of the window and you’ll be presented with all your pictures from your Instagram account.
Use An Image From the Targetable Image Library:
Targetable has a large library of images that is included for your use. To choose an image from the Targetable Image Library, click on the Pencil icon to the right of the Featured Image. Then click Targetable Library in the upper-right corner. This will reveal the Search Our Library text field where you can type a search term. Click the Search button to reveal matching images from the image library, as seen below:
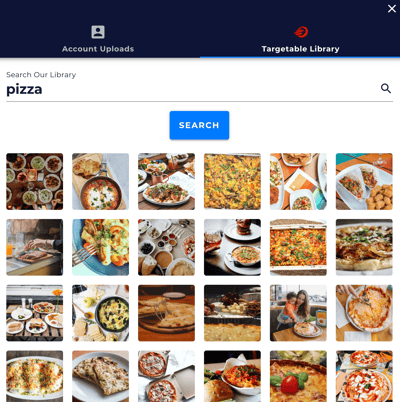
Select any photo by clicking on it, and it will immediately appear as the Featured Image on the Design Your Ad page.
Once you’ve set your ad text and featured image, click the Next button.
- Save or Publish Your Campaign
The last step of creating a Campaign asks you to either save your Campaign as a draft, publish it right away, or to review the settings.
Save Your Campaign:Your Campaign will be saved automatically. If you exit the screen at any time, it will be saved as a draft.
Review Your Campaign:
To review and edit any setting of your Campaign, click on the dropdown tab for that component (Budget & Schedule, Location & Audience, Targetable Keywords, Ad Preview). This will reveal the settings for that part of your Campaign, in which you can edit directly. If you change any setting, you must click the Save button to save your progress. Targetable will not allow you to publish unless you have saved the changes made to your Campaign.
Publish Your Campaign:
To publish your Campaign, click the Publish button. If this is your first time publishing a Campaign in Facebook, you will need to add a method of payment for your ad on Facebook. After clicking the Publish button, a new window will open prompting you to visit your Facebook account and pay for the publication of your Campaign in Facebook, as seen below: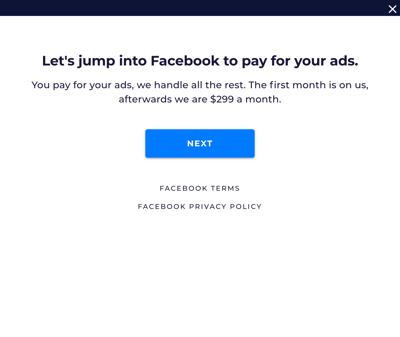
Click the Next button to open your Facebook account. Enter the payment info of your choice in Facebook Ads Payment and then click Close. Return to Targetable and click the Publish button again to publish your Campaign.
If you already have a payment method saved with Facebook, then clicking the Publish button will publish your Campaign immediately.